38 how to create labels using mail merge in word 2010
I can't access the Update Labels button in Mail Merge You will then need to insert a «Next Record» field (from the Rules drop down above the Update Labels button) before the first mergefield in all of the labels EXCEPT for the first one. Hope this helps, Doug Robbins - MVP Office Apps & Services (Word) dougrobbinsmvp@gmail.com How To Print Address Labels Using Mail Merge In Word - Label Planet This opens the Mail Merge Wizard panel on the right hand side of your screen. This panel will guide you through the SIX STEPS of the mail merge. You will primarily use this panel to set up your address labels. MAIL MERGE: STEP 1 - SELECT DOCUMENT TYPE To create a set of address labels, you will need to select LABELS from the list of documents.
How to Mail Merge and Print Labels in Microsoft Word - Computer Hope In Microsoft Word, on the Office Ribbon, click Mailings, Start Mail Merge, and then labels. In the Label Options window, select the type of paper you want to use. If you plan on printing one page of labels at a time, keep the tray on Manual Feed; otherwise, select Default. In the Label vendors drop-down list, select the type of labels you are using. In our example, we are using Avery labels. Select the product number of the labels.
How to create labels using mail merge in word 2010
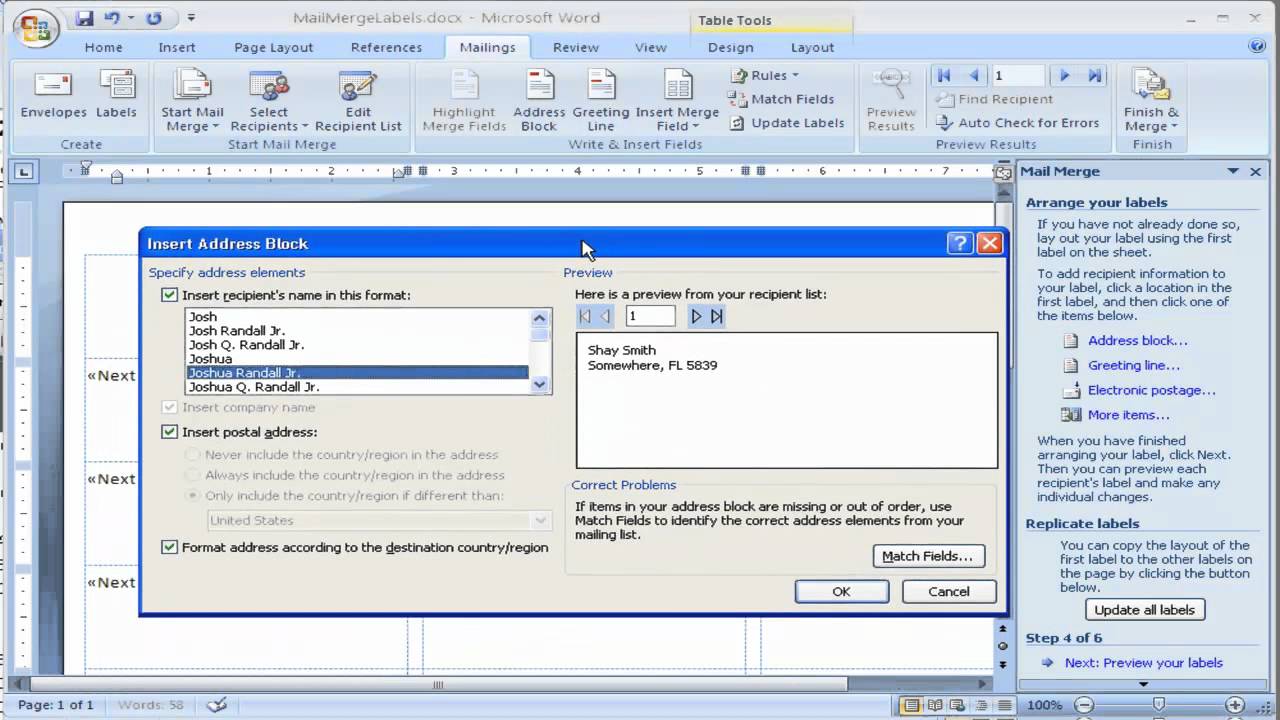
How to Make Mailing Labels from Excel 2019 | Pluralsight Find your Excel spreadsheet from Step #1 and click Open . 8. Review the data and click Ok. Click Next: Arrange your labels. 9. Move your cursor to the first label and click Address block. Select your preferred formatting (using the preview pane). 10. How to Create Mailing Labels in Word from an Excel List Step Two: Set Up Labels in Word Open up a blank Word document. Next, head over to the "Mailings" tab and select "Start Mail Merge." In the drop-down menu that appears, select "Labels." The "Label Options" window will appear. Here, you can select your label brand and product number. Once finished, click "OK." How to Create a Microsoft Word Label Template - OnlineLabels Option A: Create A New Blank Label Template. Follow along with the video below or continue scrolling to read the step-by-step instructions. Open on the "Mailings" tab in the menu bar. Click "Labels." Select "Options." Hit "New Label". Fill in the name and dimensions for your new label template.
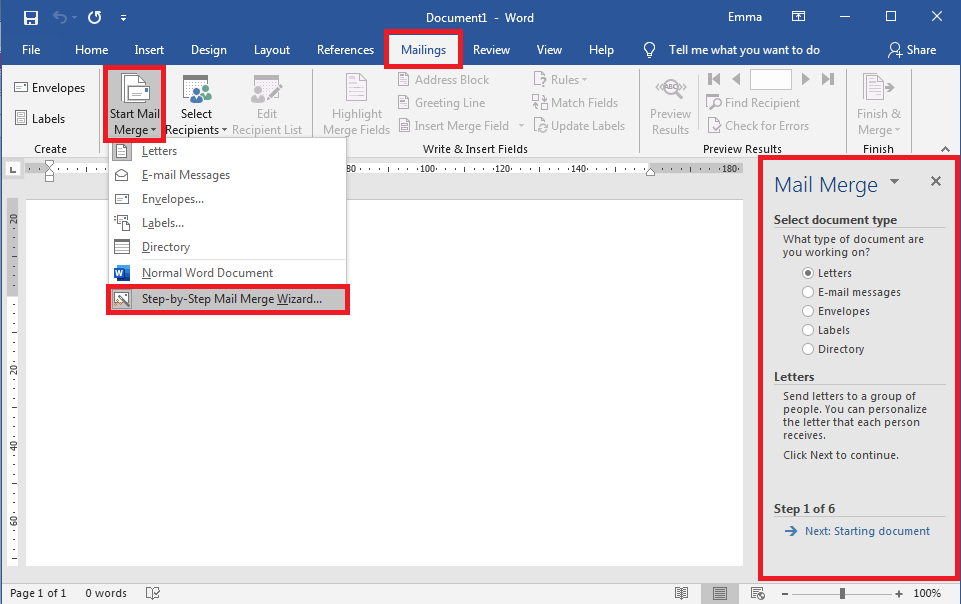
How to create labels using mail merge in word 2010. Use mail merge for bulk email, letters, labels, and envelopes Create and print sheets of mailing labels Directory that lists a batch of information for each item in your data source. Use it to print out your contact list, or to list groups of information, like all of the students in each class. This type of document is also called a catalog merge. Create a directory of names, addresses, and other information How to Create and Print Labels in Word - How-To Geek Open a new Word document, head over to the "Mailings" tab, and then click the "Labels" button. In the Envelopes and Labels window, click the "Options" button at the bottom. In the Label Options window that opens, select an appropriate style from the "Product Number" list. In this example, we'll use the "30 Per Page" option. Video: Create labels with a mail merge in Word Create your address labels. In Word, click Mailings > Start Mail Merge > Step-by-Step Mail Merge Wizard to start the mail merge wizard. Choose Labels, and then click Next: Starting document. Choose Label options, select your label vendor and product number, and then click OK. Click Next: Select recipients. Create Labels Using Mail Merge in Word 2007 or Word 2010 Create Labels Using Mail Merge in Word 2007 or Word 2010 - YouTube.
How to Perform a Mail Merge in Word 2010 (with Pictures ... - wikiHow Method 1 With the Mailings Tab Download Article 1 Launch Word 2010. 2 Navigate to Mailings Tab. 3 Go to Start Mail Merge options. 4 Click Step by Step Mail Merge Wizard. 5 Choose the type of document you want. 6 This step will ask you to choose what document to use/type document now. 7 Choose your recipients. 8 Print Labels using mail merge Office 2010 & 2013 Click Mailings > Start Mail Merge, and then click the kind of merge you want to run. Click Select Recipients > Use Existing List. Browse to your Excel spreadsheet, and then click Open. If Word prompts you, select Sheet1$ and click OK. Now the Excel spreadsheet's connected to the mail merge document you're creating in Word. How to Create Labels With a Mail Merge in Word 2019 Go to Mailings > Insert Merge Field and select the fields to show on your labels. Select OK. Format the fields in the first label so it looks the way you want the rest of your labels to look. Go to Mailings > Update Labels. Go to Mailings > Preview Results. Choose Preview Results again to view, add or remove merge fields. Select Update labels when done if you make changes. How to mail merge and print labels from Excel - Ablebits.com (Or you can go to the Mailings tab > Start Mail Merge group and click Start Mail Merge > Labels .) Choose the starting document. Decide how you want to set up your address labels: Use the current document - start from the currently open document.
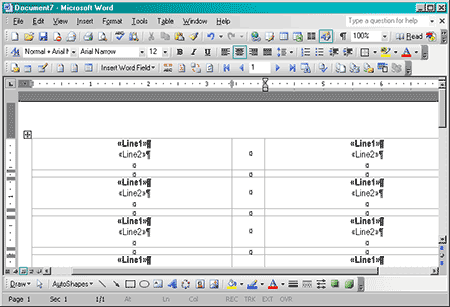
How to Create and Print Labels in Word Using Mail Merge and Excel ... Create a new blank Word document. Click the Mailings tab in the Ribbon and then click Start Mail Merge in the Start Mail Merge group. From the drop-down menu, select Labels. A dialog box appears. Select the product type and then the label code (which is printed on the label packaging). Mail merge labels in Word 2010 - Microsoft Community On the Mailings ribbon, click Insert Merge Fields and select the first field (for example, First_Name or whatever you called it) to place on the label. Type a space and insert another field (such as Last_Name), or press Enter to go to the next line and insert a field. Continue until the top left cell of the table contains all the fields you need for the label. On the Mailings ribbon, click Update Labels, which repeats the merge fields on all the other labels. Barcode Labels in MS Word Mail Merge | BarCodeWiz Step 6. Copy data to all other labels. Click on Update Labels to copy the fields into the other labels on the page. To center, click Ctrl+A followed by Ctrl+E.. Step 7. Complete the Merge. Open the Add-Ins tab and click on Convert All to finish the Mail Merge and create the barcodes. Barcode labels are created in a new document. How to Mail Merge Address Labels Using Excel and Word: 14 Steps - wikiHow Open Word and go to "Tools/Letters" and "Mailings/Mail Merge". If the Task Pane is not open on the right side of the screen, go to View/Task Pane and click on it. The Task Pane should appear. 4 Fill the Labels radio button In the Task Pane. 5 Click on Label Options and choose the label you are using from the list. Click OK once you have chosen. 6
Template Tuesday's Guide To…Using Mail Merge To Print Address Labels
PDF Word 2008 Create Labels & Letters Using Mail Merge Manager Word2008/Create Labels & Letters Using Mail Merge Manager Pat Guillette April 2010 3 6. Choose the type of label you want to use. (Standard mailing label is Avery 5160). Click OK. 7. From the Insert Merge Field button select fields and insert in the Sample Label box. When finished; click OK. 8. Under Preview Results, click Preview icon to view ...

Word 2010 Mail Merge Labels - Microsoft Community
How to Use Mail Merge in Word to Create Letters, Labels, and Envelopes Switch over to MS Word. Use the wizard for creating labels. Open a blank document and select Mailings > Select Mail Merge > Step-by-Step Mail Merge Wizard . Select Labels and then Next: Starting document . On the next screen, select Change document layout. Next, select Label options to set your product number and label brand.

Merge Mailing Labels Word 2000
How to create name badges using mail merge in Word 2010 RedCape Answer: If your list of attendees is stored in Excel, you can use the mail merge feature in Word 2010 to quickly and easily create name tags. The trick is to set up one name tag the way you want it and use the "Update Labels" command to create the remaining labels. Check out the video here: Create name tags using the Mail Merge ...
How to create Labels using Mail Merge in Microsoft Word 2007 - YouTube
How to Create Mailing Labels in Word - Worldlabel.com 1) Start Microsoft Word. 2) Click the New Document button. 3) From the Tools menu, select Letters and Mailings, then select Envelopes and Labels. 4) Select the Labels tab, click Options, select the type of labels you want to create and then click OK. 5) Click New Document. Type and format the content of your labels:
Creating Mail Merge Labels in Word 2003 - OnlineLabels.com
PDF How to Use Mail Merge to Create Mailing Labels in Word Merge fields that you insert into the main document instruct Word where to print information from the data source. When you perform the mail merge, Word replaces merge fields in the main document with information from the data source. Each row (or record) in the data source produces an individual label. Create an address book spreadsheet in Excel.

How to Create a Mail Merge Document Using Microsoft Word
Word 2010: Using Mail Merge - GCFGlobal.org Open an existing Word document, or create a new one. Click the Mailings tab. Click the Start Mail Merge command. Select Step by Step Mail Merge Wizard. The Mail Merge task pane appears and will guide you through the six main steps to complete a merge.

Create and print labels using mail merge - Word
Create Mailing Labels from Your Excel 2010 data using Mail Merge in ... Create Mailing Labels from Your Excel 2010 data using Mail Merge in Word 2010 Christmas holiday 2016 (1) Expert PC Training Videos Follow This video will show you how to make mailing labels using Microsoft Excel data and Microsoft Word Mail Merge. It works in Excel 2007, 2010, 2013, 2016 and Office 365. Report

merge excel to word template – Takub
Mail Merge Labels in Word 2007, 2010, 2013, 2016 - YouTube Kaceli TechTraining. 177K subscribers. Create a mail merge using labels and save yourself a lot of time and ensure accuracy. Learn about this concept in just 8 minutes. Learn more at ...

How to print address labels from Excel
Mail Merge for Dummies: Creating Address Labels in Word 2007 1. Before you start make sure you have your Excel spreadsheet ready. Now open up Microsoft Word 2007 and click on the Merge tab. 2. Next, click on the Start Mail Merge button and select Labels. 3. Now it's time for you to select the Label Vendor. In my case I am going to use Avery US Letter.
Label a Lot of File Folders Using Word's Mail Merge - Susan C. Daffron
How to Create Mail Merge Labels in Word 2003-2019 & Office 365 Microsoft Word 2010 Mail Merge. Open on the "Mailings" tab in the menu bar. Click "Start Mail Merge." Select "Step by Step Mail Merge Wizard." Ensure "Change document layout" is selected and click "Next: Select recipients." Choose "OnlineLabels.com" from the second dropdown list and find your label product number in the list. Click "OK."
:max_bytes(150000):strip_icc()/MailMergeWord2003-5a5aa61f22fa3a003631b2fd.jpg)
How to Print Labels from Excel
How to Create a Microsoft Word Label Template - OnlineLabels Option A: Create A New Blank Label Template. Follow along with the video below or continue scrolling to read the step-by-step instructions. Open on the "Mailings" tab in the menu bar. Click "Labels." Select "Options." Hit "New Label". Fill in the name and dimensions for your new label template.

6 Mail Merge Excel Template - Excel Templates - Excel Templates
How to Create Mailing Labels in Word from an Excel List Step Two: Set Up Labels in Word Open up a blank Word document. Next, head over to the "Mailings" tab and select "Start Mail Merge." In the drop-down menu that appears, select "Labels." The "Label Options" window will appear. Here, you can select your label brand and product number. Once finished, click "OK."

Setting up labels and mail-merge documents in Word
How to Make Mailing Labels from Excel 2019 | Pluralsight Find your Excel spreadsheet from Step #1 and click Open . 8. Review the data and click Ok. Click Next: Arrange your labels. 9. Move your cursor to the first label and click Address block. Select your preferred formatting (using the preview pane). 10.

Mail Merge Word 2016 | Tutorial Office Word

Letter Template For Mail Merge - LEWETER

Identifying Objects | by TEC-IT: How to Print Barcode Labels with Microsoft Word
Post a Comment for "38 how to create labels using mail merge in word 2010"